Effects Manager Dialog
| Setting | Description |
|---|---|
| Load Image Set | Opens the Select Images dialog to load an image or a group of images. The group of images can be loaded from the saved .efx file. |
| Load Panorama Image Set | Opens the Select Images dialog to load a group of Panorama images from the saved .efx file. |
| Load Image Into Set | Opens the Select Images dialog to load a new image into an existing image set rendered earlier. |
| Save Image Settings | Opens the Save Effects Manager File dialog to save your current adjustments of light sources´ effects settings to an .efx file. |
| Save Image Settings As | Opens the Save Effects Manager File dialog to save your adjustments of light sources´ effects with different settings to several .efx files. |
| Render Image Set | Opens the Render Images from Light Setup dialog. |
| Update design file lighting | Updates the Lighting and Environment settings to the design session. This will create a new Environment and a new Light Setup named `Effects Manager´. These setups can be used to render with the Luxology dialog to produce a rendering that closely matches the one you adjusted using the Effects Manager. You can adjust Gamma values with Effects Manager´s Tone Mapping operators, but doing so may produce some subtle differences. This is especially true if you have Auto Gamma Correction enabled; this correction is applied in the initial render and further post adjustments are not being gamma corrected. |
| Clear Selected Images | Removes the selected images from the image set. |
| Clear All Images | Removes all the images from the image set. |
| Save Image | Opens the Save MultiLight Image dialog to save the image displayed in the preview window with the current light settings. |
| Fitted to Window | If on, displays the image fitted to the preview window. |
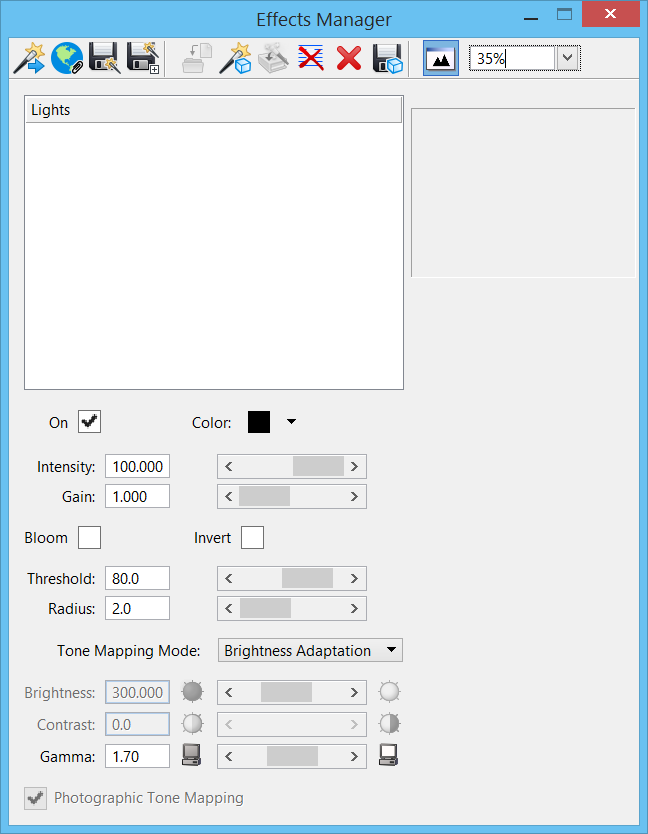
| On | The image layer and the lights associated with it can be toggled on or off by checking or unchecking the `On´ option. |
| Color | Color can be picked by the color picker or you may select from the drop-down list of color temperatures in Kelvin. |
| Intensity | Initially the slider will be set to 100% even if the light from the Light Manager had less intensity. Effects Manager uses the Lumen value and set the scale to 100 for the starting position. While the slider goes from 0 to 100 you can key in a value up to 10000. |
| Gain | This is a multiplier where the slider movement covers a range of 0 to 100. It is also possible to key in values from -10000 to +10000. Even if your scene lights have too low or too high incorrect lumen values, you will still be able to balance your lighting in the Effects Manager with Intensity and Gain controls. |
| Bloom | Settings work identical to those in the Luxology Render dialog, the exception being that it works on a per image layer basis. |
| Invert | This option inverts the image and is most useful for adding depth images or ambient occlusion layers. |
| Tone Mapping | Settings work identical to those in the Luxology Render dialog. |
| Brightness | Controls the brightness for the rendering. You can enter the values directly, or use the slider. |
| Contrast | Controls the overall image contrast for the rendering. You can enter the values directly, or use the slider. |
| Gamma | Used to compensate for the fact that monitors and printers do not have the same visual response as the human eye, and serves to bring out more detail in darker areas of images. The gamma correction for a typical monitor should be set to 1.5 to 2.5. Gamma of 1.7 works well for most LCD displays. Printers often require a higher gamma value, usually between 2.0 and 3.0. A gamma of 2 to 2.3 works well for most interior renderings and you can use lower Gamma values for exterior scenes. Once you have set the best gamma value for your device, you should not have to change it again until your hardware changes. |
| Photographic Tone Mapping | If enabled, photographic tone mapping is applied to the image. This setting produces an image that is similar to what your eyes see. This applies particularly to images with a small dynamic range (where the lightest pixel is only about 100 times brighter than the darkest). Where the image has a high dynamic range, the normal image may be better. |


